The Windows Print App,
Mac Print App, and Mobile Print App include options to submit crash reports and logs if uploading a document encounters problems.
Crash reports help wēpa support review application logs and troubleshoot upload, login, or print app issues.
Windows Print App
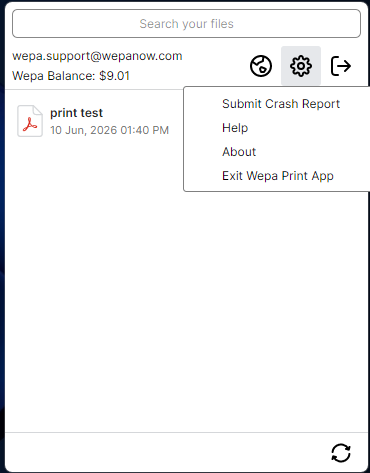
Open the Windows Print App settings view, then select Submit Crash Report to collect support logs.
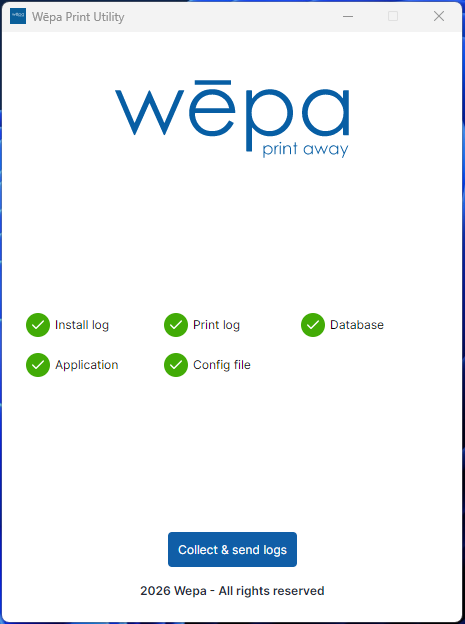
The log collection view will appear. Select Collect & send logs to collect the necessary log files.
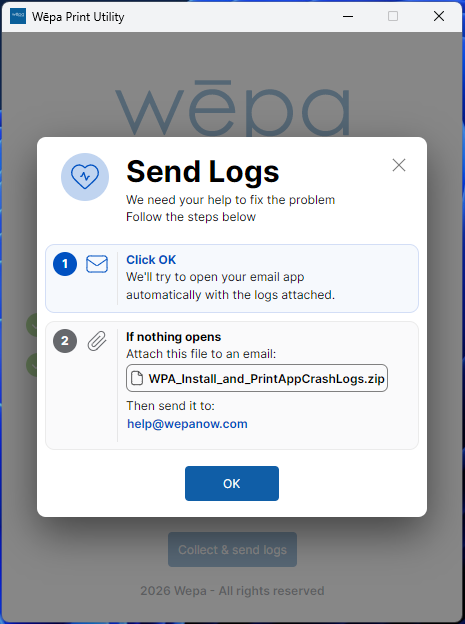
A Send Logs message will appear after the logs are collected. Select OK to open your email app automatically with the logs attached.
Include a brief description of the issue before sending the email so wēpa support can better understand what happened.
If an email window does not open, the utility will open a folder on your computer that contains the generated log zip file. Create a new email to help@wepanow.com, attach the zip file from that folder, and include a brief description of the issue.
Mac Print App
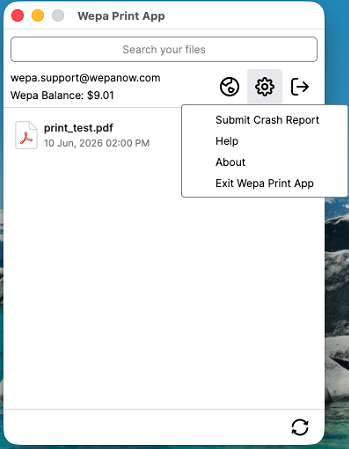
Open the Mac Print App settings view, then select Submit Crash Report to collect support logs.
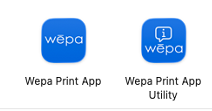
You can also open Wepa Print App Utility from the Applications folder.
It should be located beside the main Wepa Print App application.
In Wepa Print App Utility, select Collect & send logs to collect the necessary log files.
A Send Logs message will appear after the logs are collected. Select OK to open your email app automatically with the logs attached.
Include a brief description of the issue before sending the email so wēpa support can better understand what happened.
If an email window does not open, the utility will open a folder on your computer that contains the generated log zip file. Create a new email to help@wepanow.com, attach the zip file from that folder, and include a brief description of the issue.
Mobile Print App
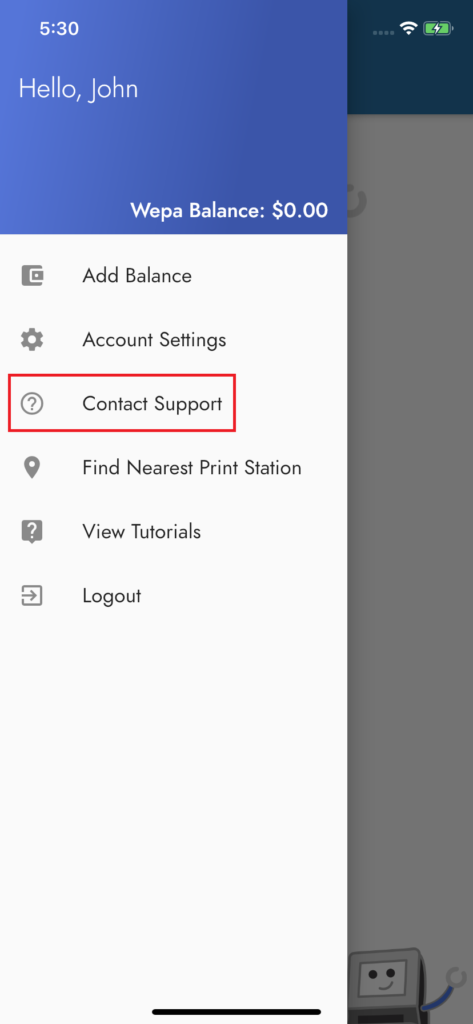
Tap the three horizontal lines in top left corner on the main screen of Mobile Print App followed by tapping the Contact Support icon highlighted below:
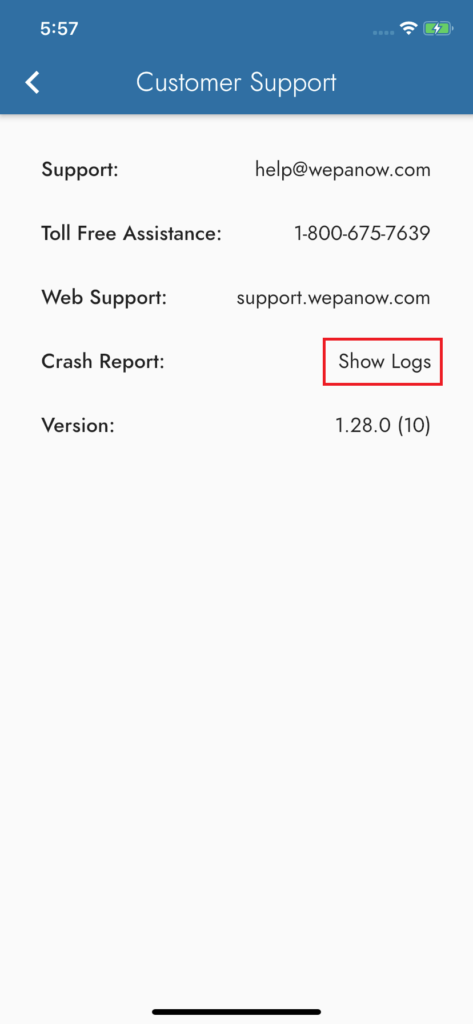
Tap Show Logs highlighted below to open the mobile app log.
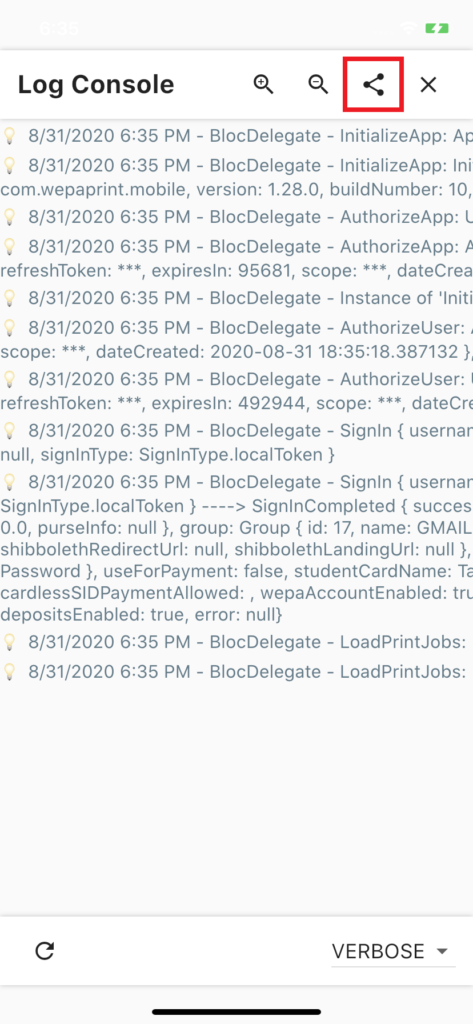
Next, select the share icon at the top highlighted below and select your preferred email client.
An email will launch with an attached log. Enter any relevant information and send the email to help@wepanow.com.
Upload documents using the Windows Print App,
Mac Print App, or
Linux Print App.
Open your document in its default software, select File > Print, choose a wēpa printer, then select Print.
Open the Print Window
Open the document normally within its default software, such as Word, Excel, PowerPoint, Preview, Adobe Reader, or another supported application.
Then select File > Print.
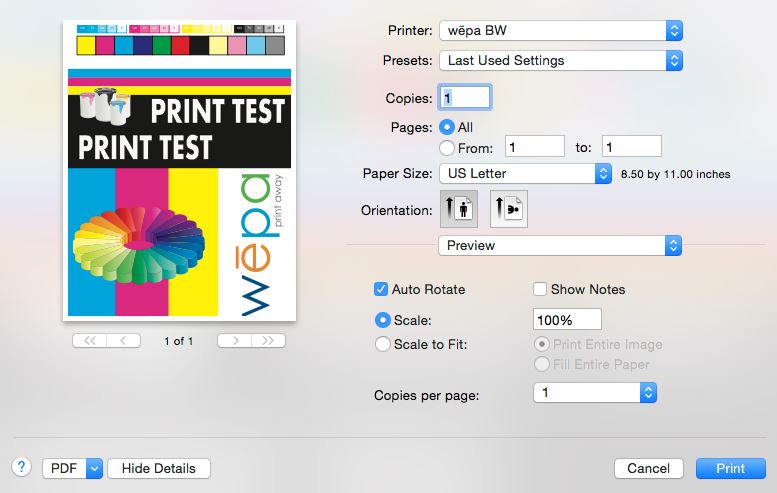
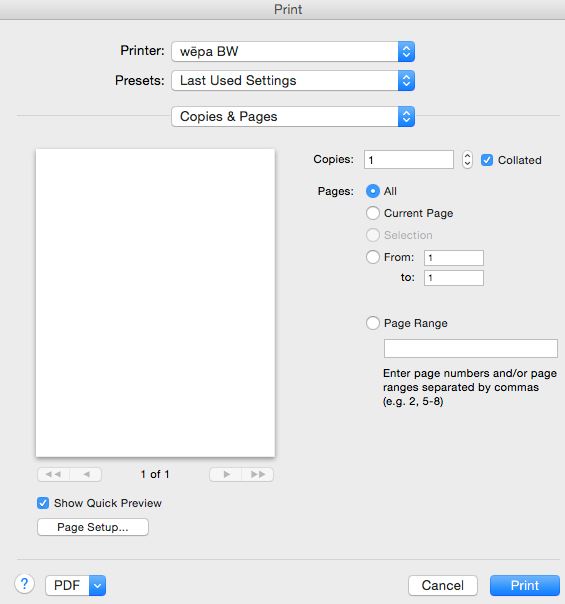
Select a wēpa Printer
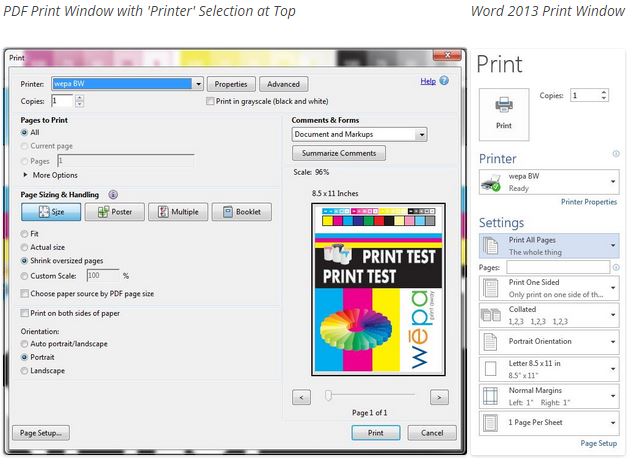
The print settings window will appear with a selected printer. Open the printer drop-down menu and choose one of the available wēpa printers.
wēpa BW
Prints black and white on the front of each page only.
wēpa BW Two-Sided
Prints black and white on the front and back of each page.
wēpa Color
Prints color on the front of each page only.
wēpa Color Two-Sided
Prints color on the front and back of each page.
Each printer option may have a different print cost per piece of paper. Contact wēpa support at
help@wepanow.com, chat with support, or call 1-800-675-7639 for print costs at a specific institution.
Windows Print App: Print Windows
Mac Print App: Print Windows
PDF print window with printer selection at the top:
Word print window:
Format Settings
Choose any needed print format settings, such as printing multiple pages per sheet, page range, copies, or orientation.
Review the print preview before uploading to confirm the document looks correct.
Page size note: Select Page Setup and confirm the page size is set to Letter 8.5 x 11 in.
If the page size is set to something else, the document may not upload or may not appear at the print station.
After choosing a wēpa printer and confirming the format settings, select Print to upload the document.
If using a public or lab computer, enter your username and password when prompted to complete the upload.
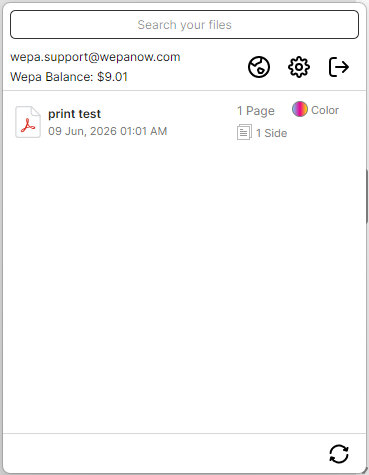
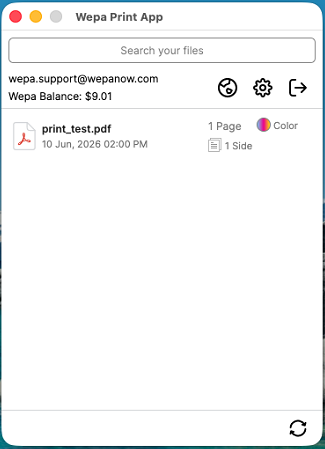
Documents Uploaded
Click the wēpa icon to see the full list of documents uploaded to the
wēpa account.
The wēpa icon for Windows is located in the lower-right system tray area.
For Mac, it is located in the upper-right toolbar area.
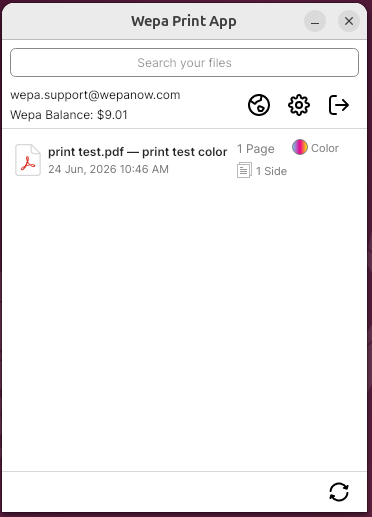
Windows Print App – Documents Uploaded
Mac Print App – Documents Uploaded
Linux Print App – Documents Uploaded
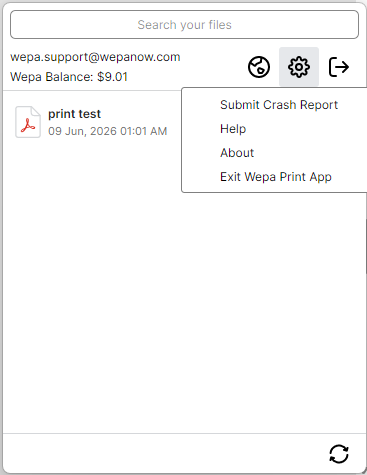
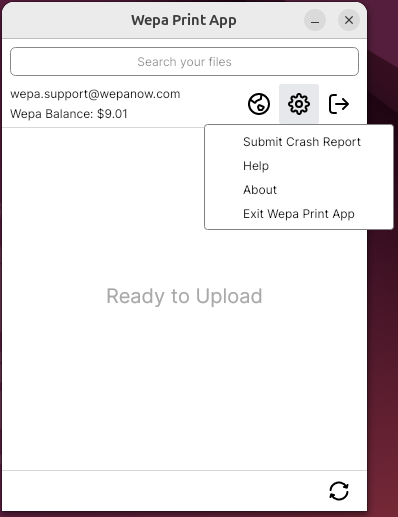
Submit Crash Report
If you encounter issues uploading a document, select the print app icon, open settings, and choose
Submit Crash Report.
This helps wēpa support review logs and troubleshoot the issue.
Windows Print App – Submit Crash Report
Mac Print App – Submit Crash Report
Linux Print App – Submit Crash Report
If the Submit Crash Report option is unavailable, use the troubleshooting log instructions below:
wēpa institutional customers can deploy the wēpa Print App for Mac to multiple public computers by generating deployment files with the
Wepa Lab Configurator.
The configurator creates a Settings.xml file and an install.sh script for the selected school and lab configuration.
The WepaPrintApp.pkg installer must be placed in the same generated folder before running the install script.
Use the Wepa Lab Configurator to generate Mac deployment files.
Place WepaPrintApp.pkg in the generated deployment folder.
Deploy the full folder to each public Mac and run sudo ./install.sh.
macOS Compatibility: The Mac Print App is supported on macOS 12.0 and above.
If you are using an older macOS version, contact help@wepanow.com for assistance.
Should I update my driver?
If you are using a version below 2026.7.10, we recommend updating to our latest version.
Important: The Wepa Lab Configurator generates Settings.xml and install.sh.
It does not include the Mac Print App package. Download or obtain the Mac Print App installer separately and make sure it is named exactly WepaPrintApp.pkg.
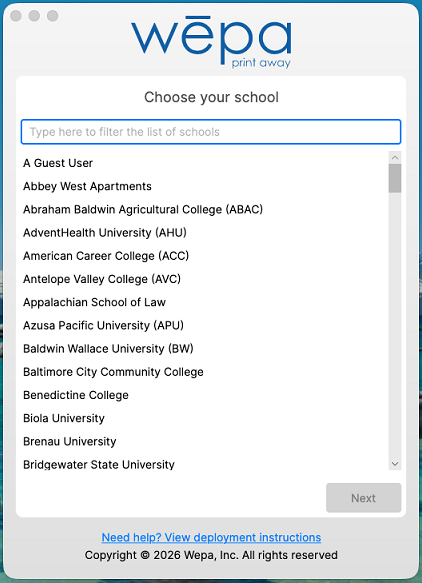
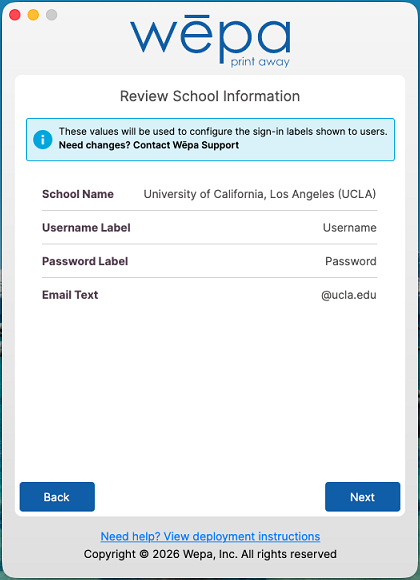
Open the Wepa Lab Configurator on macOS and choose your school or institution.
Review retrieved school configuration
The Wepa Lab Configurator retrieves the configuration available for your institution.
Contact your wēpa Project Manager or help@wepanow.com if any of these values need to change.
Create Deployment Files
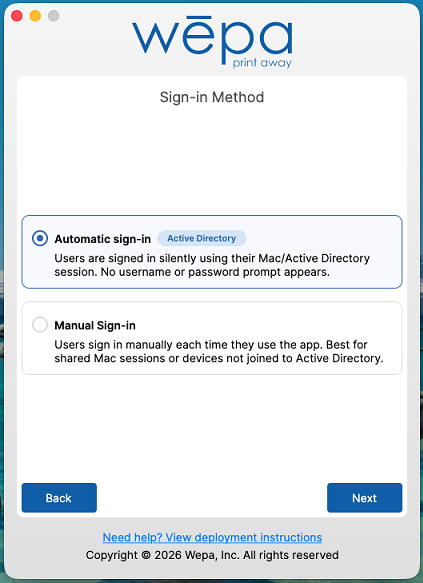
Configure Active Directory login, if available
If your school has approved Active Directory login, this screen lets you choose whether users are signed in automatically with their Mac / Active Directory session or prompted to sign in manually.
Select Manual Sign-in to configure the additional lab settings shown in the next steps.
If Active Directory login is not available for your school, manual sign-in is selected automatically and the lab settings configuration appears next.
If Automatic sign-in is selected, the default printer selection appears next.
The additional lab sign-in settings are skipped because Active Directory login removes the need for those manual sign-in options.
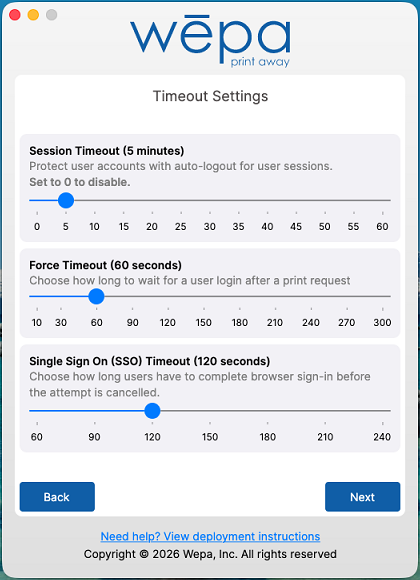
Configure manual sign-in timeout settings
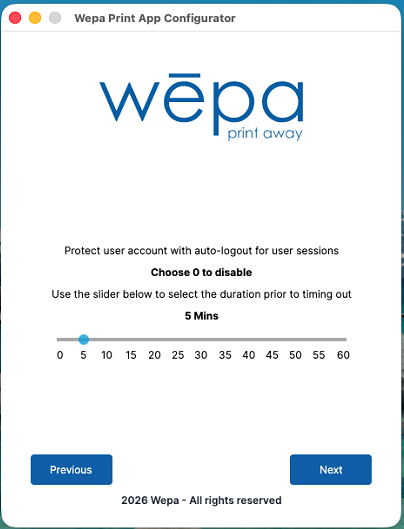
Configure timeout settings for manual sign-in. The Session Timeout controls when users are prompted to log out or stay signed in.
Set the Session Timeout to 0 to disable it when users log in and out of macOS with their own accounts.
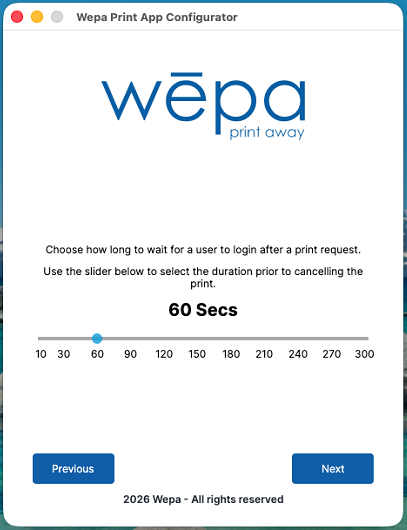
The Force Timeout controls how long the Print App waits for a user to log in or choose guest printing after a print request starts.
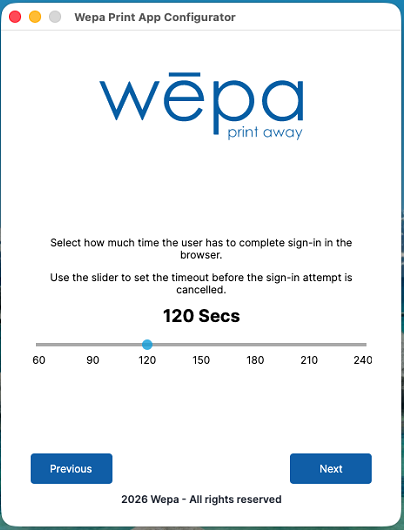
If your school is set up with Single Sign-On, a configurable Single Sign On (SSO) Timeout is available as well.
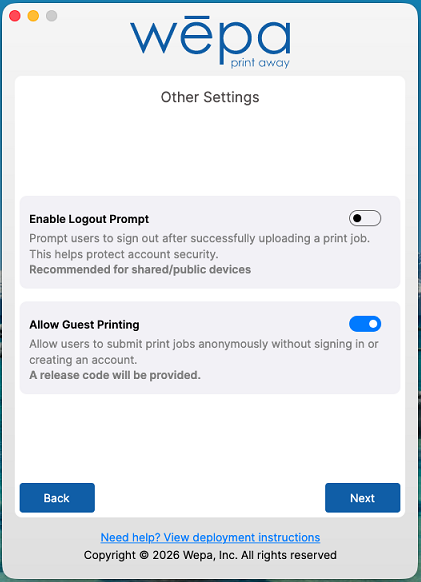
Configure other manual sign-in options
Configure the remaining manual sign-in options for shared or public Macs.
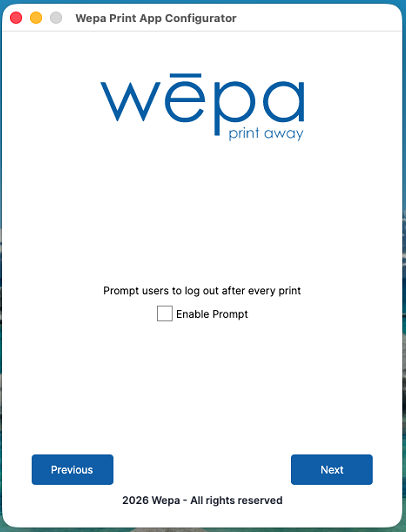
Enable Logout Prompt prompts users to sign out after successfully uploading a print job, which helps protect account security on shared devices.
Allow Guest Printing lets users submit print jobs without signing in or creating an account.
A release code will be provided so the user can release the document at a print station.
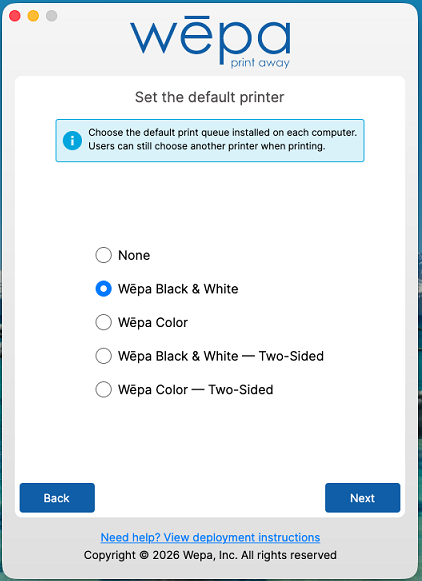
Configure default printer
Choose which wēpa printer will be selected by default in the application.
Users can still change to a different wēpa printer when printing.
For Default Printer, select None to leave the existing default printer unchanged.
Default printer note: If a default printer is selected, the install script attempts to set that wēpa printer as the default printer on the Mac during deployment.
In shared lab environments where different users sign in to the same Mac, default-printer behavior can vary by user session and by how the Mac is managed.
For institution-managed Macs, your IT team may also manage default printers using Apple’s
Printing device management payload
through MDM. If no default printer is selected, users can still choose the desired wēpa printer when printing.
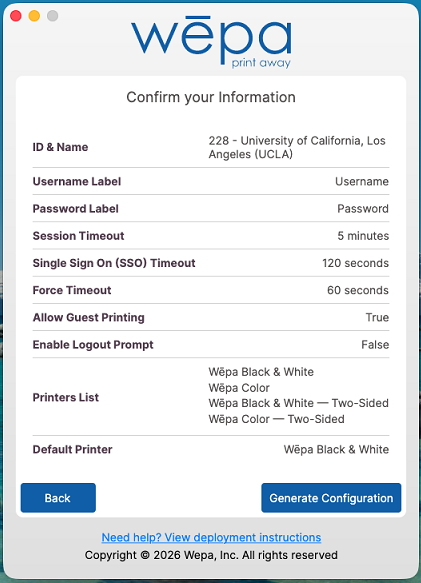
Confirm selected options
Review the selected configuration options. If the options are correct, select Generate Configuration.
If changes are needed, select Back and update the configuration.
Review the final generated view
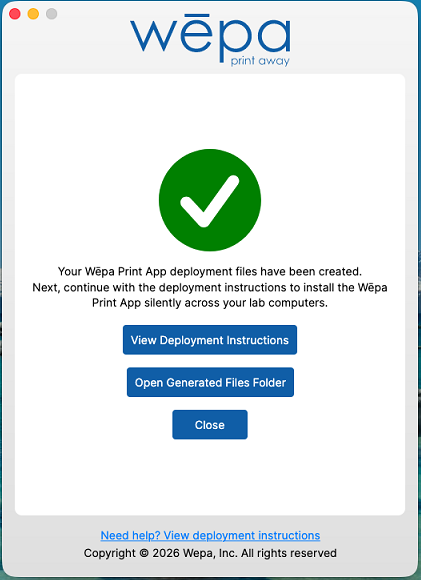
After the deployment files are generated, the Wepa Lab Configurator will show the final result.
View Deployment Instructions opens this support page with deployment instructions.
Open Generated Files Folder opens the folder where the generated Mac deployment files are located.
Close closes the Wepa Lab Configurator.
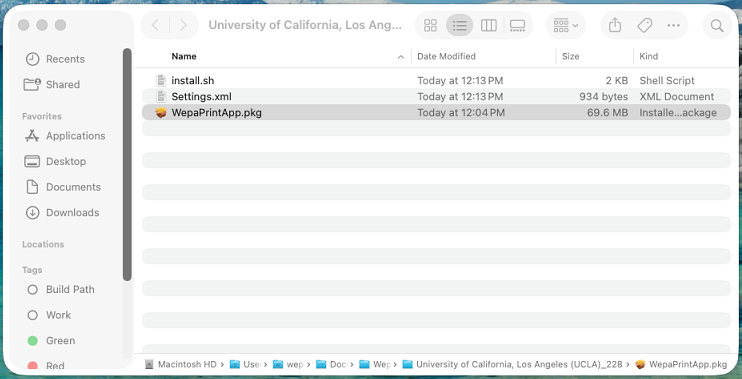
Generated Files
Open the generated files folder
When the deployment files are generated, Finder opens to the generated folder location.
The Mac deployment folder is created under:
The generated folder should contain Settings.xml and install.sh.
The Mac Print App installer package must be placed in the same folder and named exactly WepaPrintApp.pkg.
Add WepaPrintApp.pkg to the generated folder
Place WepaPrintApp.pkg in the same folder as Settings.xml and install.sh before deployment.
The install script expects the package to be named exactly WepaPrintApp.pkg.
Important: Keep Settings.xml, install.sh, and WepaPrintApp.pkg together in the same folder before running the installer script.
How to Deploy the Application
Deploy the full generated folder to each public Mac. The folder should include:
File
Purpose
Settings.xml
Contains the school and lab deployment configuration generated by the Wepa Lab Configurator.
install.sh
Installs the package, places Settings.xml in the correct system location, and applies default printer settings if configured.
WepaPrintApp.pkg
The Mac Print App installer package. This file must be placed in the generated folder and named exactly WepaPrintApp.pkg.
On each Mac, open Terminal in the deployment folder and run:
sudo ./install.sh
The generated Settings.xml file is installed to
/Library/Application Support/Wepa/PrintApp/Settings.xml.
For existing deployments using the new wēpa Print App v.2026.6.7 or newer, the generated Settings.xml file can also be copied to
/Library/Application Support/Wepa/PrintApp/Settings.xml to replace the existing file.
This updates the app configuration settings only; it does not install or upgrade the WepaPrintApp.pkg application package.
The wēpa Print App must be closed and restarted before it will load the new Settings.xml settings.
What install.sh Does
The generated install.sh script performs the deployment tasks below:
Verifies it is running on macOS.
Requires Settings.xml and WepaPrintApp.pkg to be in the same folder as install.sh.
Copies Settings.xml to /Library/Application Support/Wepa/PrintApp/Settings.xml.
Installs WepaPrintApp.pkg with the macOS installer command.
Sets ownership and permissions for the Wepa application support folders and Settings.xml file.
If a default printer was selected, waits for the printer to be available and sets it as the default printer.
Default printer mapping
If a default printer is selected in the Wepa Lab Configurator, the install script uses the corresponding printer name below:
Configurator Selection
Printer Name Used by install.sh
Wepa Black & White
WEPA_MON_SIM_PDF
Wepa Color
WEPA_COL_SIM_PDF
Wepa Black & White – Two-Sided
WEPA_MON_DUP_PDF
Wepa Color – Two-Sided
WEPA_COL_DUP_PDF
None
No default printer is set.
Reminder: The old wepaPreference.plist and manual login item deployment steps are no longer used for this workflow.
Use the generated Settings.xml and install.sh deployment flow instead.
If the Mac Print App encounters problems, submit print app logs first when possible.
Logs help wēpa support review upload, login, or print app issues.
If the built-in log collection option does not work, use the manual log retrieval section below.
Submit Print App Logs
Open the Mac Print App settings view, then select Submit Crash Report to collect support logs.
You can also open Wepa Print App Utility from the Applications folder.
It should be located beside the main Wepa Print App application.
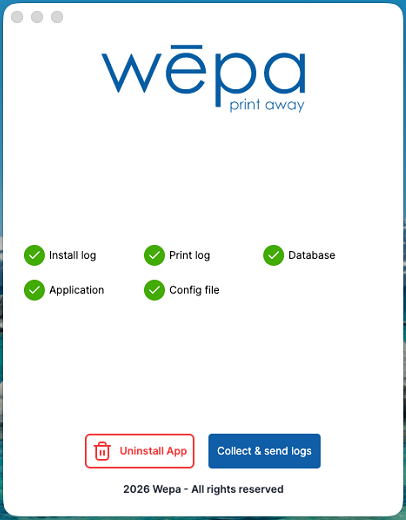
In Wepa Print App Utility, select Collect & send logs to collect the necessary log files.
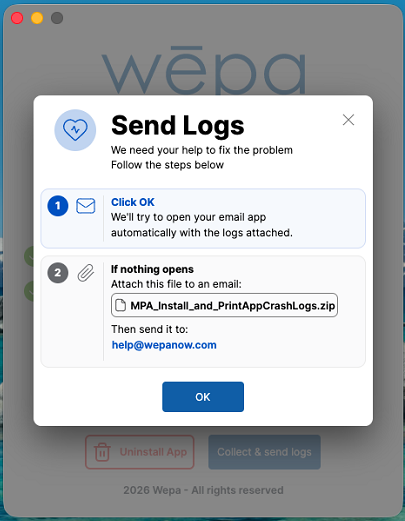
A Send Logs message will appear after the logs are collected. Select OK to open your email app automatically with the logs attached.
Include a brief description of the issue before sending the email so wēpa support can better understand what happened.
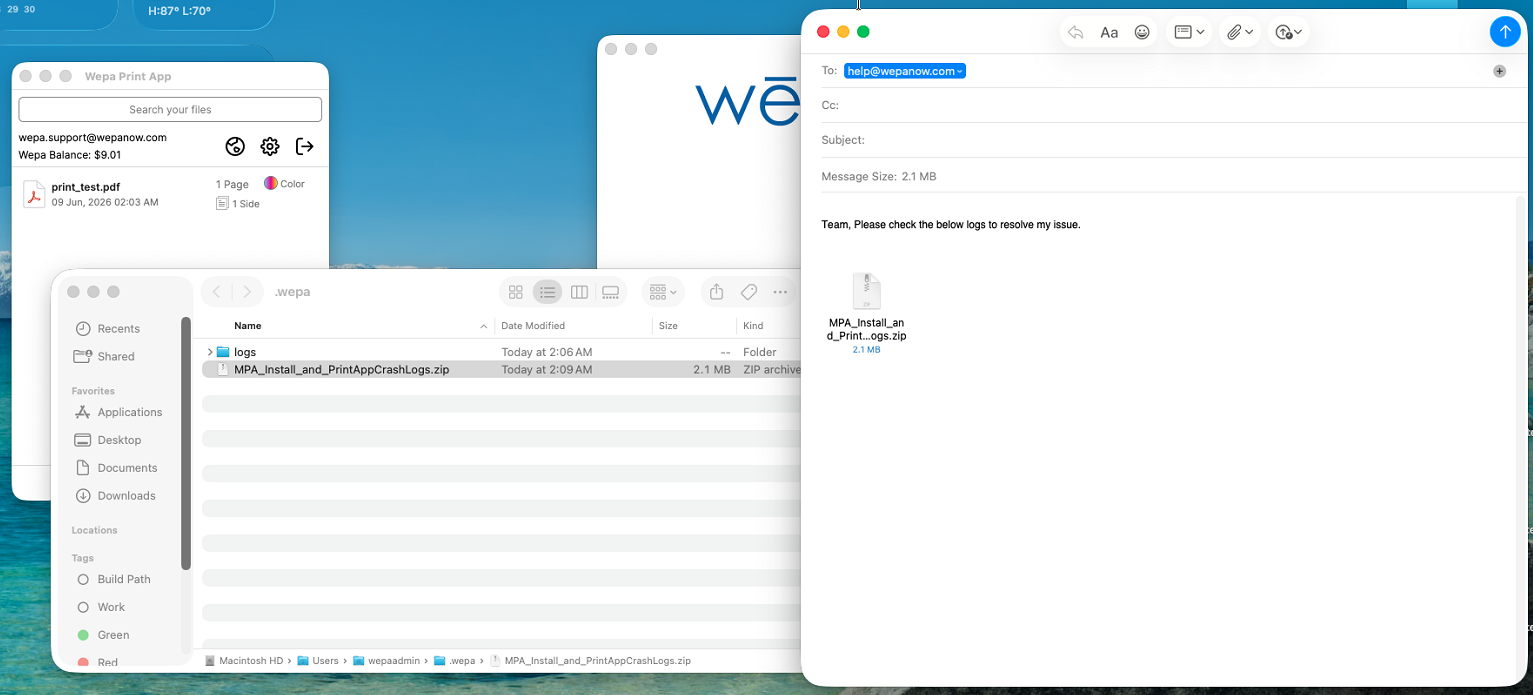
If an email window does not open, the utility will open a folder on your computer that contains the generated log zip file.
Create a new email to help@wepanow.com, attach MPA_Install_and_PrintAppCrashLogs.zip from that folder, and include a brief description of the issue.
Manual Log Retrieval
If you cannot submit logs from the Mac Print App, manually retrieve the files below and send them to
help@wepanow.com with a brief description of the issue.
Log Type
macOS Location
What to Send
Print app logs
/var/log/com.wepa.printapp/
Send PrintApp.log. If present, also send PrintApp.Secondary.log, mpalauncher_log, wpapdfqueue_log, and any other recent files in this folder.
CUPS / PDF queue log
/var/log/com.wepa.printapp/wpapdfqueue_log
Send this file for print, CUPS, print-to-PDF, or “job never appeared” issues.
Crash logs
/var/log/com.wepa.printapp/
Send any recent .txt files from this folder. Crash logs are timestamped text files created when unhandled exceptions occur.
Generated zip from utility
~/Documents/MPA_Install_and_PrintAppCrashLogs.zip
This zip file is created after the log collection utility runs. Send this file if the utility opens the folder but does not open an email window.
Install log
/var/log/install.log
Send this file if the issue is related to installation, upgrade, or uninstall.
Send this file if the issue appears related to app configuration, login behavior, timeout settings, guest printing, or default printer settings.
Open the log folder
In Finder, select Go > Go to Folder from the menu bar.
Paste the following path, then press Return:
/var/log/com.wepa.printapp
Attach PrintApp.log to your email. If PrintApp.Secondary.log, mpalauncher_log, wpapdfqueue_log, or recent timestamped .txt crash files are present, attach those as well.
Open the generated zip location
The generated zip file is created only after the log collection utility runs. If the utility opens a folder but does not open an email window, attach the zip file from your Documents folder:
~/Documents/MPA_Install_and_PrintAppCrashLogs.zip
Attach MPA_Install_and_PrintAppCrashLogs.zip to a new email and send it to
help@wepanow.com with a brief description of the issue.
Open the install log location
In Finder, select Go > Go to Folder from the menu bar.
Paste the following path, then press Return:
/var/log
Attach install.log if the issue is related to installation, upgrade, or uninstall.
Open the app settings location
In Finder, select Go > Go to Folder from the menu bar.
Paste the following path, then press Return:
/Library/Application Support/Wepa/PrintApp
Attach Settings.xml if support requests app configuration details.
Tip:/var/log/com.wepa.printapp is a system log folder, not a hidden folder in the user home directory.
Using Go > Go to Folder is usually the easiest way to open it.
Log Notes
The main Mac print app log file is PrintApp.log.
If a second instance of the app is running, PrintApp.Secondary.log may also be present.
mpalauncher_log may also be present in the same Mac log folder.
wpapdfqueue_log may also be present in the same folder and is useful for print, CUPS, print-to-PDF, or “job never appeared” issues.
Mac print app logs and timestamped crash .txt files are located in /var/log/com.wepa.printapp/.
The generated crash report zip, MPA_Install_and_PrintAppCrashLogs.zip, is created in the user’s Documents folder after the log collection utility runs.
/var/log/install.log may be useful for installation, upgrade, or uninstall issues.
Settings.xml may be useful for troubleshooting app configuration, login behavior, timeout settings, guest printing, or default printer settings.
Send the logs to help@wepanow.com and include what happened, the approximate time the issue occurred, and the document name or file type if the issue happened during upload.
macOS Compatibility: The Mac Print App is supported on macOS 12.0 and above.
If you are using an older macOS version, contact help@wepanow.com for assistance.
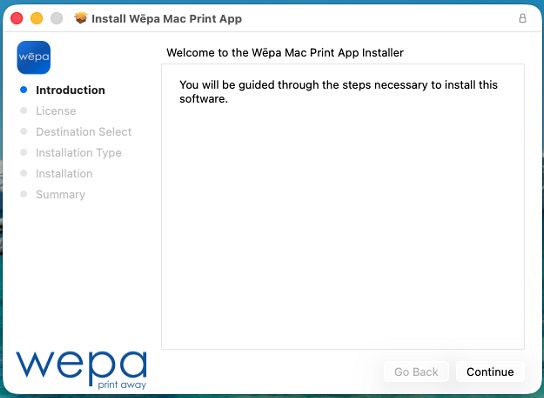
Open the .pkg file to begin installation. If Gatekeeper
is set to only allow apps from the Mac App Store, right-click or control-click the installer, select Open,
then click Open on the warning dialog.
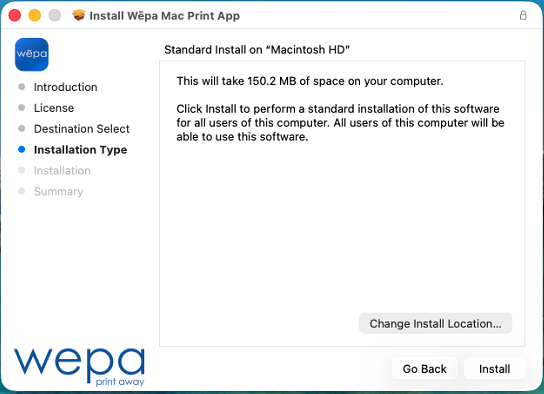
Press Continue and proceed through the installation steps.
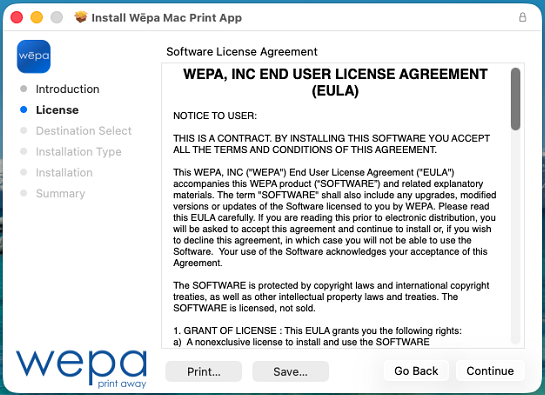
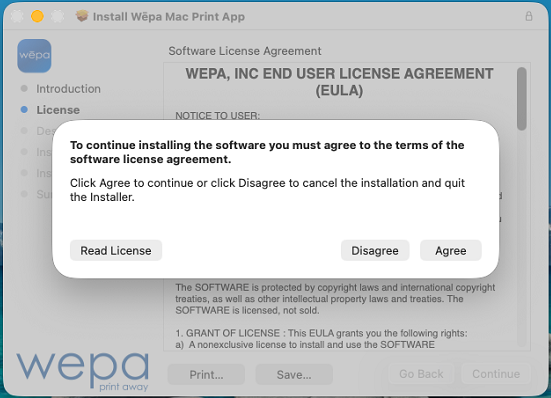
Choose Continue, then accept the terms of the license agreement.
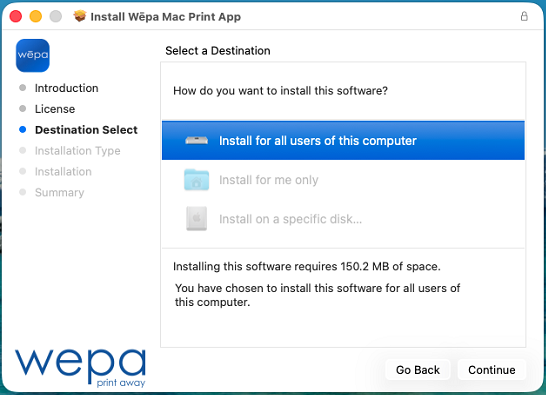
Select the installation destination and continue. The installer will show the standard installation location before the install begins.
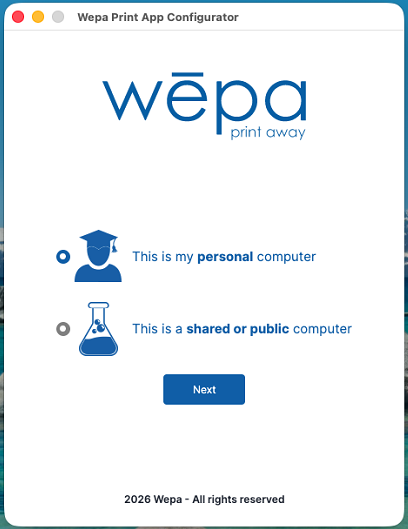
When the application launches, select personal if installing on a personal computer or
shared or public if installing on a shared or public computer, such as a lab environment.
Click Next to proceed.
Important: If you choose shared or public, this choice becomes locked and cannot be changed to the personal version.
You must uninstall and reinstall if you decide you want the personal version.
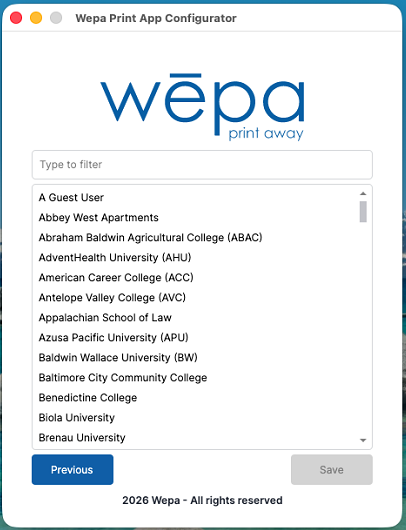
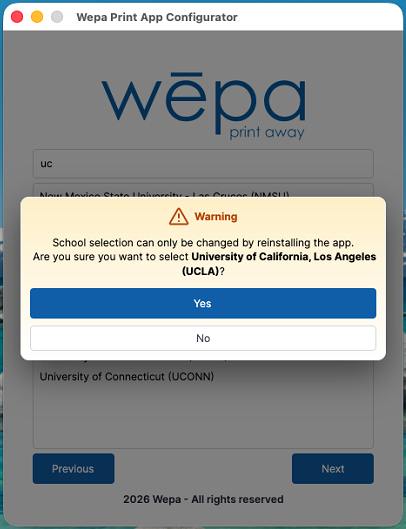
Select your school or institution. If you are not affiliated with one, choose A Guest User.
Lab / Public Options
After you choose the school, you are notified that this choice can only be changed by uninstalling and reinstalling the application.
Set a session timeout value. Users will be automatically logged out of the application after a set amount of time.
Set the value to 0 to disable the session timeout.
For Single Sign-On (SSO) schools, select the timeout for the user to complete sign-in in the browser.
Choose how long to wait for a user to log in after a print request.
If there is no login, the print attempt will be canceled after this amount of time.
Choose whether to prompt users to log out after every print. This choice is appropriate when users do not log in and out of the Mac with their own account.
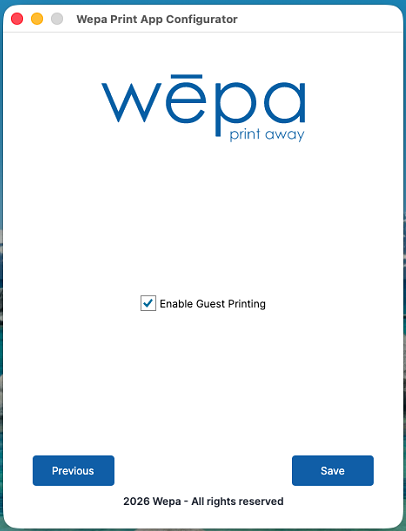
Select whether the Guest Printing option is available. This option enables guest printing on the login screen.
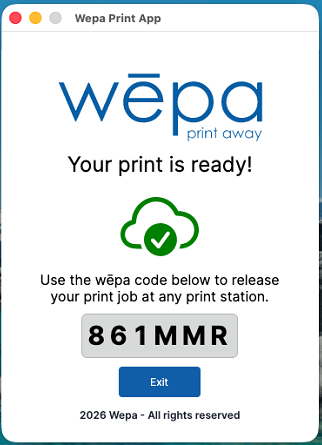
Users can upload a document to a guest account and receive a six-character
wēpa code
that can be used at any print station.
Reminder: These choices become locked and cannot be changed. You must uninstall and reinstall to choose a different school or different options.
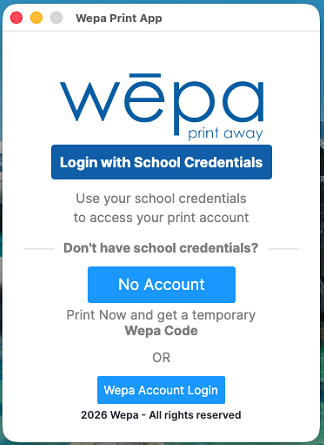
Choose Save to finish the setup process. The login screen may look different depending on your school’s sign-in configuration.
For Single Sign-On (SSO) schools, users will see a Login with School Credentials button.
Selecting this option launches an external browser so users can sign in on the school’s login page.
If Guest Printing is enabled, select No Account to print without signing in and receive a wēpa code.
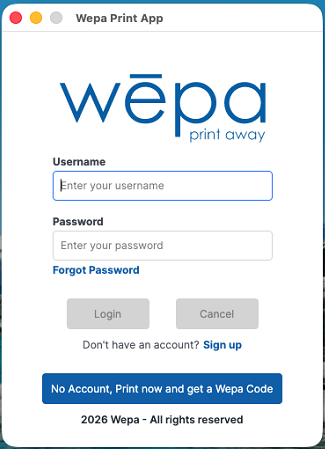
For non-SSO schools, the login screen will request a username and password.
If Guest Printing is enabled, select No Account, Print now and get a Wepa Code to print without signing in.
How to Print
From any software that can print, choose File > Print, select a wēpa printer from the drop-down menu, and select Print.
If you are not already signed in, a login prompt will appear.
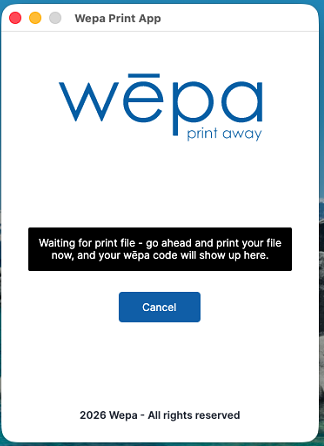
The Mac Print App will show the print job while it is processing.
The print job will be shown as ready if the upload was successful. The app will show document details, such as the number of pages, color mode, and one-sided or two-sided setting.
Use the Mac Print App window to review uploaded files. Remember to log in at the print station to see all of your documents.
You do not have to use release codes if you have an account.
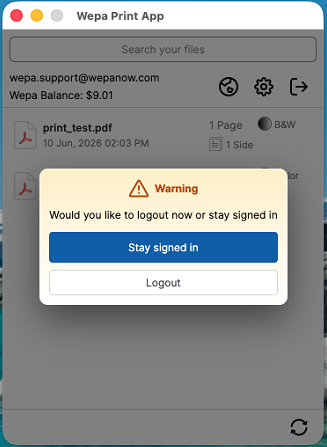
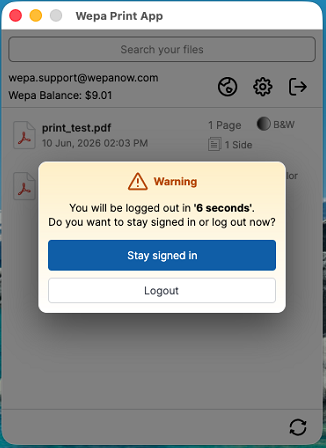
Lab Only: If prompt to logout after every print is enabled, a window will appear requesting the user to stay signed in or log out after each upload.
Select Logout if finished printing to ensure the next user will not print to your wēpa account, or select Stay signed in if continuing to print.
Lab Only: If the session timeout is enabled, a window will appear requesting the user to stay signed in or log out after the configured amount of time has passed without a print.
Settings and Troubleshooting
Select the settings option to view additional tools and support options.
Click Submit Crash Report
to email necessary logs to wēpa support. If it is grayed out, select
here
to manually retrieve these logs.
The Wepa Print App Utility can also be used to collect and send logs if the main app cannot submit the crash report.
Guest Printing
If the Guest Printing option was enabled during setup, select No Account, Print now and get a Wepa Code on the login screen to print without signing in.
Select the guest printing option, then send your print job to a wēpa printer.
The Guest Printing window will process and upload the document, then provide a
wēpa code
to use at any print station.
Setting Default Printer
To set the default printer on macOS, open System Settings or System Preferences, then select Printers & Scanners.
Choose the desired wēpa printer as the default printer. ‘Last Printer Used’ can cause issues, especially for Public / Lab environments with multiple users.
Uninstalling
Open the Applications folder and locate Wepa Print App Utility.
It should be located beside the main Wepa Print App application.
Open Wepa Print App Utility, then select Uninstall App.
Confirm the uninstall when prompted and enter the Mac administrator password to proceed.
Older Print App Versions
Some Macs may still show an older version of the Mac Print App. The overall process is similar, but the screens may look different from the examples above.
If your screen does not match this article, update to the latest version from the
wēpa software page, or contact your school’s IT support if you are using a lab or public computer.
Multiple methods are available to print at a wēpa print station. The following post provides information on the different methods of uploading and/or printing documents: